Avada is currently one of the most popular themes in use for WordPress. We’ve used it for clients on a number of sites purely because it’s easy to use and therefore, easy to train clients to use when they need to make content updates. One thing we try to do as often as possible when building a website is to make the backend as simple as possible for the client. Our goal is for our clients to be able to make minor content changes to their websites themselves, which is the whole point of a content management system.
The main way I make the backend of WordPress user friendly is to incorporate custom post types. Most of the time clients want to update their site, it’s not usually the page content itself. Company missions and services don’t change all that often, so learning one time how to update a page you may not touch for another year is a waste of time for all involved. What clients do love to post are testimonials, job openings, projects, portfolio items, etc. These are all things I like to handle with custom posts. And instead of searching through the WordPress repository to find the perfect plugin with all the features you need, I find it easier to just create a CPT, add a few custom fields, and bang out page and post templates. Nothing beats clicking “Add New post_type”, filling out a few blanks, and clicking “Publish” when it comes to EASY!
The challenge for developers is integrating custom post types into whatever theme they’re using. I thought I’d give a brief run through on what I feel is the fastest, easiest ways to handle things on the development side, which ensures things are easy for you client. Here are the plugins you’ll need to pull this off:
*Note: This is a paid plugin available in the Envato store. It’s totally worth the price to easily integrate your CPTs into the Avada theme.
For learning purposes, I’ll be walking through the process of adding a custom post type to Avada by creating a “Project” post type with taxonomies setup as categories.
Step One: Install and activate the plugins.
No need to go into detail here. CPT and ACF are available through the WordPress repository. Our third plugin will have to be installed manually.
Step Two: Create a Custom Post Type
There is great documentation for this plugin already available from the developer. The majority of this process is handled by filling in the blanks. I won’t spend a ton of time on it, but there are a few things to consider when creating a custom post type.
Post Type Slug: Pick something that is unique that may not be found in other plugins. It’s always best to prefix the slug. In this example, we will be using ‘tft_project‘.
Custom Rewrite Slug: This is where you can eliminate the ugly slug we created and use something more SEO friendly. We’ll just go with ‘project‘ here.
Has Archive: The default is set to false, and in this example I like to leave it alone. I’ll be creating my own “Archive” page and don’t want the built in WP one. I’m going to create a “Projects” page and pull them ins using a shortcode we’ll get with the CPT Fusion Build plugin we purchased.
Hierarchical: Going with True here, if only because I like to have the option for parent-child relationships.
Supports: I like to limit these to as few as possible. Again, it’s all about less clutter and making things as easy as possible on the client. If they don’t need post formats for the CPT, there’s no reason to show it to them. My go to is Title, Editor, Featured Image, Excerpt, and Revisions.
Built-in Taxonomies: You’ll need to come back to this once you’ve added taxonomies.
Step Three: Create Custom Post Type Taxonomies
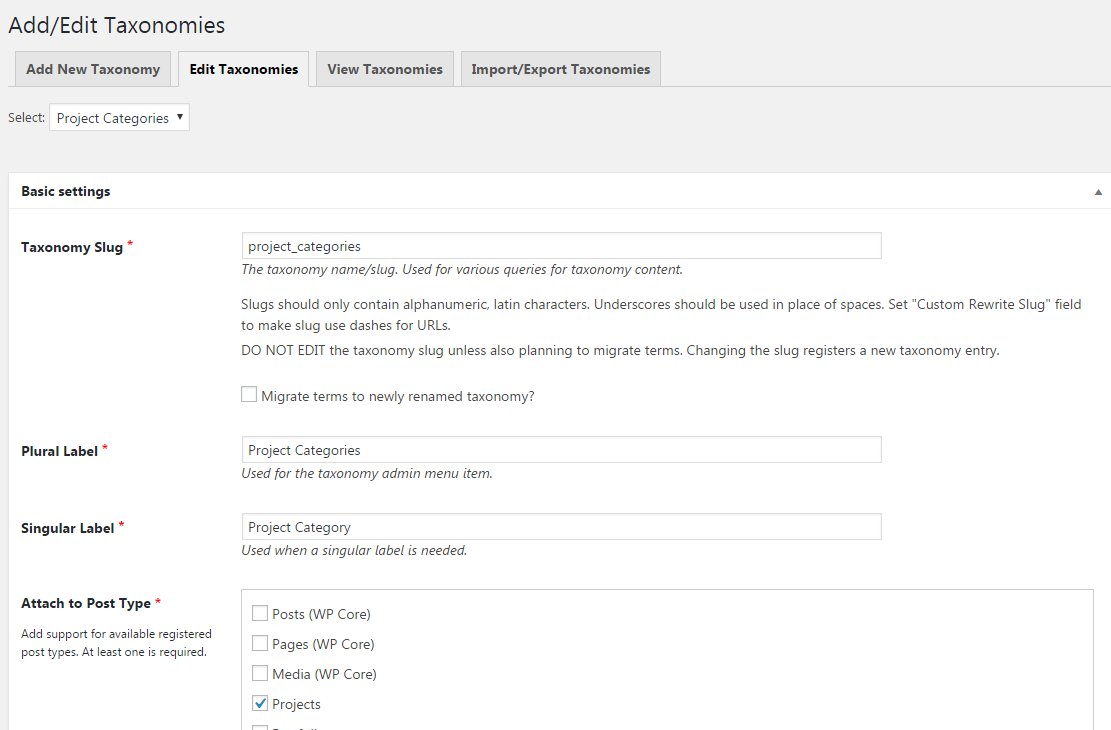
Creating taxonomies is similar to creating the post type itself. There are several blanks to fill out and with only a couple key points of note.
Taxonomy Slug: Again, pick something unique. In our example, I chose project_categories, project_services and project_location.
Attach to Post Type: This is where you select the post type these taxonomies will appear. Be sure to select the post type you created in in the previous step. In our case it’s “Projects”.
Hierarchical: Again, going with True here so I have the option to use parent-child.
Once you’ve created your taxonomies, be sure to go back and edit your custom post type and “add support for available registered taxonomies.”
Step Four: Create custom fields using Advanced Custom Fields plugin
This is where the customization really starts to take shape. The first thing I have to do is create a field group. I created one called “Project Fields” and this will hold all the fields for our custom post type. I’ll then create and image field called “Company Logo” and another field called “Company Website Link”. These will allow the client to upload a logo and insert a link whenever applicable. You can find great documentation for ACF at their website.

To make things easy on the client, be sure to fill out detailed “Field Instructions” for you them to follow. For example, I always like to lay out preferred image size instructions such as “Upload the company logo. Please keep image size no larger than 250px in width or height.” I always make sure to setup my template and CSS to accommodate whatever image they upload and serving a smaller file size, but I’ve found it very helpful all around if you list a suggested image size. It helps preserve the post design and encourages the use of small images for quicker load times.
The most important part of this step is to set the “Location” rules for the fields. “Post Type is equal to project” will ensue the new fields ONLY show up on out custom post. I’m also a fan of setting these fields to be “High (after title)” in the options to make sure they don’t get missed when creating a new post.
Be sure to publish the fields upon completion so they show up on your post.
Step Five: Create a custom post template file using an Avada post template.
Now that we’ve got the custom post type and fields set up, it’s time to create a post template design to display them. Avada comes with several templates and example files to pull from, but I find the easiest thing to do is create a copy of single.php and rename it as single-post_type.php, so single-project.php in our example. This will ensure our custom post type pulls in all the built in HTML and style of Avada posts.
To have the ACF fields pull into the template, we have to add them using the “Field Name” the plugin created and some custom php. Again, the developer docs will help you with this part. The key, however, is to add them somewhere around <?php the_content(); ?> in the template, depending on your intended design. As long as the custom fields are within <div class=”post-content”>, your post should maintain the overall look/style you create with Avada’s theme options. You most likely will need to create some custom CSS to style your fields, but the header, footer, and site wrappers should all be handled by Avada. Here’s the code I used for this example:
<div class="post-content">
 <div class="project-fields">
 <?php
 // see https://www.advancedcustomfields.com/resources/image/
 $image = get_field('company_logo');
 if( !empty($image) ):

 // vars
 $url = $image['url'];
 $title = $image['title'];
 $alt = $image['alt'];
 $caption = $image['caption'];

 // thumbnail
 $size = 'medium';
 $thumb = $image['sizes'][ $size ];
 $width = $image['sizes'][ $size . '-width' ];
 $height = $image['sizes'][ $size . '-height' ];

 echo '<p style="text-align:center;"><img src="' . $thumb . '" alt="'. $alt .'" /></p>';
 endif;

 $terms = get_the_terms( get_the_ID(), 'project_services' );
 if ( $terms && ! is_wp_error( $terms ) ) :

 echo '<h3>Project Services</h3>';
 echo '<ul>';
 foreach ( $terms as $term ) {
 echo '<li>' . $term->name . '</li>';
 }
 echo '</ul>';
 ?>

 <?php endif; ?>
 <?php

 if(get_field('company_website_link'))
 {
 echo '<style type="text/css" scoped="scoped">.fusion-button.button-3 .fusion-button-text, .fusion-button.button-3 i {color:#ffffff;}.fusion-button.button-3 {border-width:0px;border-color:#ffffff;}.fusion-button.button-3 .fusion-button-icon-divider{border-color:#ffffff;}.fusion-button.button-3:hover .fusion-button-text, .fusion-button.button-3:hover i,.fusion-button.button-3:focus .fusion-button-text, .fusion-button.button-3:focus i,.fusion-button.button-3:active .fusion-button-text, .fusion-button.button-3:active{color:#ffffff;}.fusion-button.button-3:hover, .fusion-button.button-3:focus, .fusion-button.button-3:active{border-width:0px;border-color:#ffffff;}.fusion-button.button-3:hover .fusion-button-icon-divider, .fusion-button.button-3:hover .fusion-button-icon-divider, .fusion-button.button-3:active .fusion-button-icon-divider{border-color:#ffffff;}.fusion-button.button-3{background: #57008d;}.fusion-button.button-3:hover,.button-3:focus,.fusion-button.button-3:active{background: #711aa7;}.fusion-button.button-3{width:auto;}</style>';
 echo '<div class="fusion-button-wrapper fusion-aligncenter">';
 echo '<a class="fusion-button button-flat fusion-button-round button-small button-custom button-3" target="_self" href="' . get_field('company_website_link') . '"><span class="fusion-button-text">Visit Project Site</span></a>';
 echo '</div>';
 echo '<div class="fusion-clearfix"></div>';

 }
 ?>
 </div>
 <div class="project-content">
 <?php the_content(); ?>
 </div>
 <div><?php fusion_link_pages(); ?></div>
</div>
This step of the process may take the most time depending on how many fields you want to display and how you want your individual posts to look. Although Avada will do most of the heavy lifting, you’ll still need to spruce things up a bit to get to your desired design.
Step Six: Add the custom post types to a page in Avada.
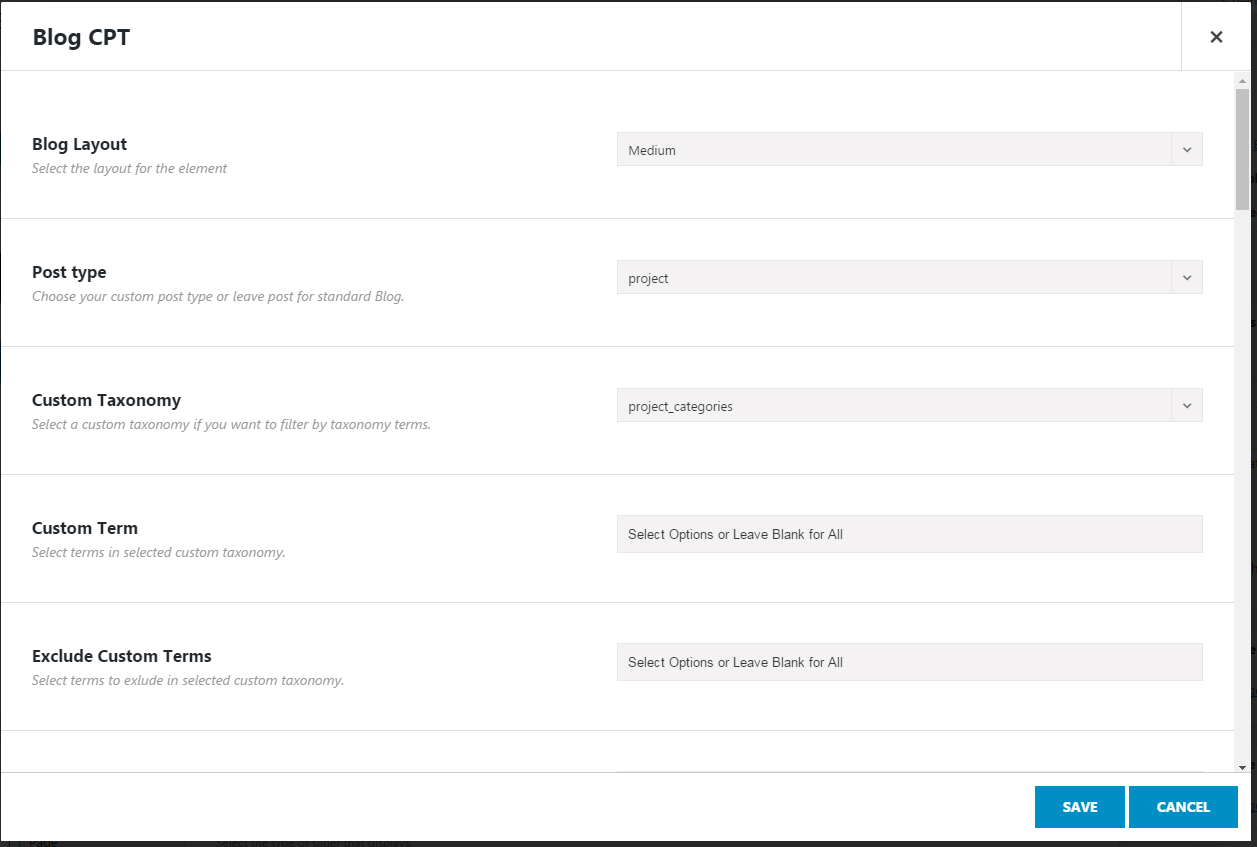
The final step in the process is to add posts to a page of your website. The plugin “Custom Post Types and Taxonomies for Fusion Builder” makes this part a breeze. This plugin will add a “Blog CPT” option in the Avada Fusion Builder. It works the same way as the built in “Blog” fusion builder element, except it allows you to select your newly created post type.
Create a container or column and add the element as you would any other using the Fusion Builder editor. Select any desired options for display style, but be sure to select the post type “project” to display your new posts. When you preview your page, you’ll now see a blog list with your specified custom post type. The style of each excerpt is determined by the options you chose when generating the shortcode and the style options you’ve selected in the Avada Theme Options.
Final Thoughts
Being able to incorporate custom solutions into popular themes is a great way to add value to your business and your client websites. It allows you to reap the benefits of the development speed of using premium themes, while still integrating easy to use functionality for the end admin user. By utilizing the plugins and methods I listed, you can add custom post types to Avada and turn it into an even more robust CMS.
If this tutorial helped you or you’d like more detail on one of the steps, please leave a note in the comments.
Hi,
great article.
How do I go about using my custom type posts in an Avada’s blog feed?
Just to let you know that the author of the “Custom Post Types and Taxonomies for Fusion Builder” plugin just released the new one that helps to add Custom Fields to the Page template.
https://codecanyon.net/item/custom-field-element-for-fusion-builder/22247344
This article is great and quickly got me started. In your example the post template should be single-tft_project.php since its based on the Post Type Slug field not the friendly name